

Operation of the instrument etching system
The instrument etcher works by passing a low-voltage current (only about 8V) through a pre-printed stencil.
The current is transferred through the gaps in the stencil using a harmless electrolyte fluid.The imprint on the stencil is transferred onto the product in around 2-3 seconds by pressing the marking head onto the metal instrument, with the stencil in between.
Therefore the process involves:
- Choose a stencil option
- Set up the marking unit
- Mark your parts
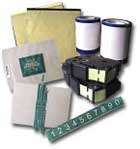
1. Selecting a suitable stencil option
Depending on the information you need to mark onto the instrument, there are a number of different stencils available.
A stencil contains the message you wish to transfer onto the part.
There are both pre-printed long-life stencils or short-life stencils which you can print yourself as required.
The types of markings we can accomplish include:
- Hospital names
- Asset numbers for tracking systems
- Date marks
- Doctor's names
- Instrument tray identification
- Hospital logos
2. Setting up the unit
Setting up the unit is fast & easy
|
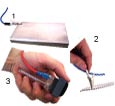
Step 1 -Plug in marking unit and leads Connect the power plug to a power socket(1). Plug the red and blue wires into the sockets at the back of the unit (2). Once the unit is set-up, you can leave everything plugged in. The MiniEtch requires NO MAINTENANCE! |
 |
|
Step 2 - Attach red/blue leads Clip the blue lead alligator clip to a metal plate (1) or directly onto the instrument(2). Clip the red lead to the marking head (3). The marking head holds a felt pad and a thin mesh which improves the print quality (sect 3) |
 |
|
Step 3 - Prepare the marking head 1. Cut a small piece of Black Felt to the same dimensions as your marking head. 2. Cut a piece of Conductive Net to overlap the marking head on all sides by about 15mm. 3. Clip the cassette on the marking head so that it holds the Net and Felt in place. |
 |
|
Step 4 - Moisten the marking head pad. Wet the marking head with an applicator or dip it in some electrolyte from a container and "squeegee" against the sides. Briefly re-moisten the head every 5-10 prints. Electrolyte is NOT A VOLATILE CHEMICAL and is SAFE to handle. |
 |
Now the unit is ready to mark parts. No warm-up is required and the felt pads will last up to 1000 prints before cutting a new section from the supply. Every 5 etchings or so you need only to quickly re-moisten the pad.
3. Marking the part.
Simply place the instrument on the base plate (or touch the clip to it), position your printed stencil and press the marking head down on the imprint in the stencil. The mark is completed in 2-3 seconds!!!
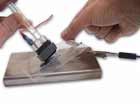
1.Marking the part with a single permanent stencil in a plastic frame
2. Close-up of marked instrument
More information:
- Instrument marking introduction
- How the instrument etching system operates
- Stencil Options for Instrument Identification